PR/MR Workflow

Info
In this documentation all references to pull requests can be change to merge requests for GitLab. However, the resulting Kubernetes object will still be named TerraformPullRequest.
Components
The server
Info
For more information about the server, see the architectural overview documentation.
Upon receiving a Pull Request creation event, the server creates a TerraformPullRequest resource.
Upon receiving a Pull Request deletion event, the server deletes the related TerraformPullRequest resource.
The pull request controller
The pull request controller is a Kubernetes controller which continuously monitors declared TerraformPullRequest resources.
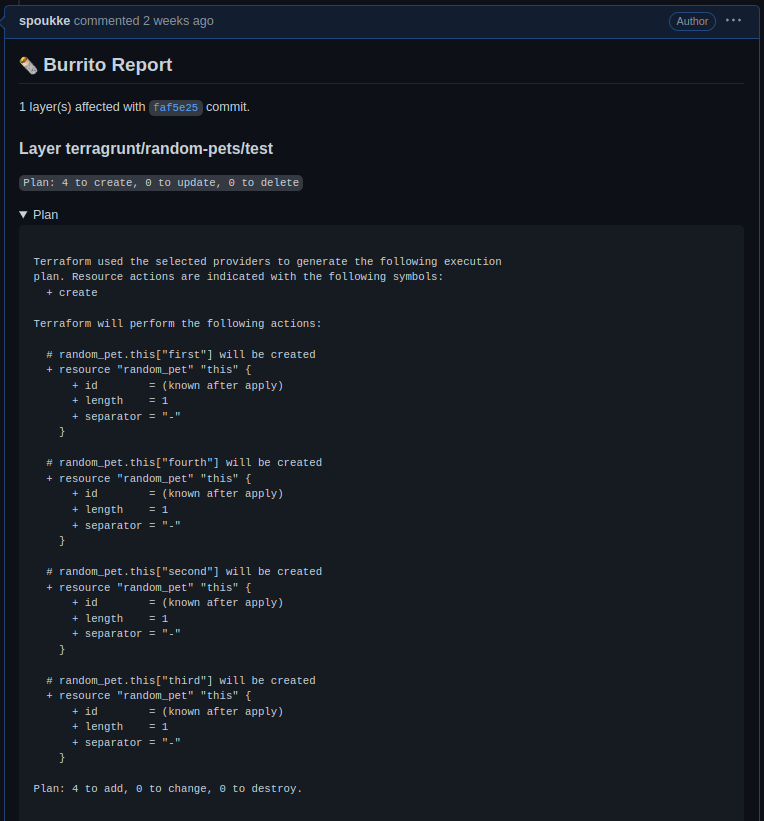
It is responsible for creating temporary TerraformLayer resources linked to the Pull Request it was generated from. Once all the TerraformLayer have planned, it will send a comment containing the plan results to the pull request.
Implementation
The status of a TerraformPulLRequest is defined using the conditions standards defined by the community.
3 conditions ared defined for a pull request:
IsLastCommitDiscovered. This condition is used to check if we received a new commit on the pull request by comparing the latest commit on the branch and the last discovered commit.AreLayersStillPlanning. This condition is used to check if all the temporary layers have finished planning. This is done by checking all the resultingTerraformLayerstatuses.IsCommentUpToDate. This condition is used to check if the controller needs to send a comment to a pull request. This is checked by comparing the last discovered commit and the last commit for which a comment was already sent.
Info
We use annotations to store information.
With those 3 conditions, we defined 3 states:
Idle. This is the state of a pull request if nothing needs to be done.DiscoveryNeeded. This is the state of a pull request if the controller needs to check which layers are affected on the given pull request.CommentNeeded. This is the state of a pull request if the controller needs to send a comment to the git provider's API.
Configuration
GitHub with a dedicated GitHub App
Create the GitHub App
You can create and register GitHub Apps in your personal GitHub account or in any GitHub organization where you have administrative access.
Follow the instructions in the GitHub documentation on Creating a GitHub App. Populate the settings as follows:
- GitHub App Name: Choose a name for your GitHub App. For example, something featuring
burrito. - Homepage URL: Enter https://padok-team.github.io/burrito.
- Webhook: Deselect Active. The app doesn't use this webhook events mechanism at the moment.
- Permissions: Configure the following Repository Permissions.
- Metadata: Select Read-only.
- Pull requests: Select Read & write. This is required to issue comments on pull requests.
- Where can this GitHub App be installed: Select Any account.
Creating a custom badge for your GitHub App
You can create a custom badge for your GitHub App to display on your GitHub repository. Follow the instructions in the GitHub documentation on Creating a custom badge for your GitHub App.
We suggest using the following one:
![]()
Install the GitHub App
Follow the instructions in the GitHub documentation on Installing your own GitHub App, and note the following:
- For Repository access, select Only select repositories, and then select the repos you want to connect with Burrito.
Get the Installation ID and App ID
You need the Installation ID and App ID to configure Burrito.
- Get the Installation ID from the URL of the installed app, such as:

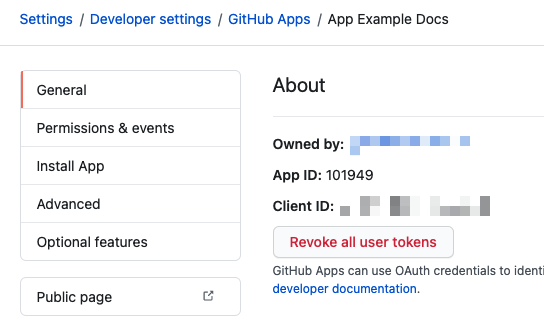
- Get the App ID from the app's General tab.
Generate a private key
You need a private key for your GitHub app to configure Burrito.
-
Follow the instructions in the GitHub documentation for generating private keys for GitHub Apps
-
Save the private key file to your local machine. GitHub only stores the public portion of the key.
Configure Burrito
Add the following environment variables to your Burrito controller deployment:
BURRITO_CONTROLLER_GITHUBCONFIG_APPID: The App ID of your GitHub app.BURRITO_CONTROLLER_GITHUBCONFIG_INSTALLATIONID: The Installation ID of your GitHub app.BURRITO_CONTROLLER_GITHUBCONFIG_PRIVATEKEY: The private key of your GitHub app.
For example:
apiVersion: v1
kind: Secret
metadata:
  name: burrito-github-config
  namespace: burrito
type: Opaque
stringData:
  BURRITO_CONTROLLER_GITHUBCONFIG_APPID: "123456"
  BURRITO_CONTROLLER_GITHUBCONFIG_INSTALLATIONID: "12345678"
  BURRITO_CONTROLLER_GITHUBCONFIG_PRIVATEKEY: |
    -----BEGIN RSA PRIVATE KEY-----
    ...
    -----END RSA PRIVATE KEY-----
GitHub with a personal access token
Generate a personal access token
You need a personal access token to configure Burrito. You can generate a personal access token in your GitHub account.
Follow the instructions in the GitHub documentation for creating a personal access token:
- It should be a fine-grained token.
- Permissions: Configure the following Repository Permissions.
- Metadata: Select Read-only.
- Pull requests: Select Read & write. This is required to issue comments on pull requests.
- Under Repository access, select which repositories you want the token to access.
Configure Burrito
Add the following environment variables to your Burrito controller deployment:
BURRITO_CONTROLLER_GITHUBCONFIG_APITOKEN: The personal access token of your GitHub app.
For example:
apiVersion: v1
kind: Secret
metadata:
  name: burrito-github-config
  namespace: burrito
type: Opaque
stringData:
  BURRITO_CONTROLLER_GITHUBCONFIG_APITOKEN: github_pat_123456
GitLab
Generate a private token
You need a private token for your GitLab app to configure Burrito. You can generate a private token in your GitLab account. Follow the instructions in the GitLab documentation for generating a private token.
Configure Burrito
Add the following environment variables to your Burrito controller deployment:
BURRITO_CONTROLLER_GITLABCONFIG_APITOKEN: The private token of your GitLab app.BURRITO_CONTROLLER_GITLABCONFIG_URL: The URL of your GitLab instance.
For example:
apiVersion: v1
kind: Secret
metadata:
  name: burrito-gitlab-config
  namespace: burrito
type: Opaque
stringData:
  BURRITO_CONTROLLER_GITLABCONFIG_APITOKEN: "123456"
  BURRITO_CONTROLLER_GITLABCONFIG_URL: "https://gitlab.example.com"
| Environment variable | Description |
|---|---|
BURRITO_CONTROLLER_GITHUBCONFIG_APPID |
the GtiHub App ID to send comment to GitHub's API |
BURRITO_CONTROLLER_GITHUBCONFIG_INSTALLATIONID |
the GitHub Installation ID to send comment to GitHub's API |
BURRITO_CONTROLLER_GITHUBCONFIG_PRIVATEKEY |
the GitHub App private key to send comment to GitHub's API |
BURRITO_CONTROLLER_GITHUBCONFIG_APITOKEN |
the API token to send comment to GitHub's API |
BURRITO_CONTROLLER_GITLABCONFIG_APITOKEN |
the API token to send comment to GitLab's API |
BURRITO_CONTROLLER_GITLABCONFIG_URL |
the URL of the GitLab instance |